How To Create an Instagram Shop? [Step-by-Step Tutorial]
How to Create an Online Store on Instagram?
As you know, the Instagram market is very hot these days and almost everyone has an account on this platform. Of course, everyone has a specific goal of creating a page on this platform. One may want to have some fun, another might want to follow his favorite celebrities to learn more about their lifestyle, and some might want to start their own business. For the last category, those looking to make money on Instagram, it goes without saying how stressful it can be to start a business and start from scratch. Right now, Instagram is coming like a hero to business owners to take some of the burden off their shoulders. but how?
Since Instagram’s goal is to serve users and make things easier for them, it uses every opportunity to improve itself. If we say that Instagram has not been able to improve every day, we would be lying. On the contrary, this platform, in its updates, has been able to fix its bugs and defects, and has been able to surprise its users with new and creative ideas.
In one of these magical updates, Instagram unveiled a new feature and it was providing the possibility of creating a store on this platform. This feature, which can be named Instagram shopping app, is so attractive and useful that it has been able to delight business owners and make things much easier and less troublesome for them.
If you wonder about How to Set up a Free Instagram Store? and want to make a successful online shop on Instagram, stay with us until the end of this article from Twilinstok to learn How To Create an Instagram Shop in a few steps.
How to Create an Online Store on Instagram?
Before we teach you how to create a store on Instagram, it is better to answer one of the common questions in this field. Can I get the Instagram shop feature? And how do I add a digital shop to Instagram? If you carefully follow the tips that we teach below, your chances of using this feature more effectively will be much higher. Now I have a question for you: Do you know what an Instagram online store is?
What is an Instagram Shop?
The Instagram shop feature is one of the new features of this platform that allows business account owners to display a digital catalog of their products directly to their audience.

You probably know that before enabling such a feature, Instagram had become one of the business platforms where many people tried to sell their products. Before the possibility of creating a shop on Instagram was added to this platform, business accounts could only post their products and stories and ask the audience to visit the website and buy from them through a link in the bio or story.
You may think that this work is not very difficult, but I must say that you are very wrong. To be honest, many people don’t want to go to the website and buy from there. Many customers don’t have the patience to leave Instagram, go to the website and find the product they want there. Of course, they are right.
Many people would give up buying because of going through this long process and would not buy their favorite product. It was here that the designers of Instagram felt that sellers and buyers needed a proper infrastructure to shop directly on Instagram itself. As a result, they decided to design the Instagram store/shop so that no one needs to leave Instagram for shopping and can shop directly on this platform. As it turns out, this capability created an unprecedented transformation in businesses and pushed them into the future. That is the reason why Instagram shopping app and Instagram shopping fees have become frequently asked by Instagram users. Therefore, we are going to explain everything about the Instagram shopping feature in this article.
What are the main Instagram Shopping Features?
When Instagram shopping is activated for you, you can use a series of special features. For example, you can share photos of your products in this shop, tag their prices, give discounts, introduce the name and properties of that product, add your website link to your posts, and show related products.
Have you ever visited an Online Store on Instagram?
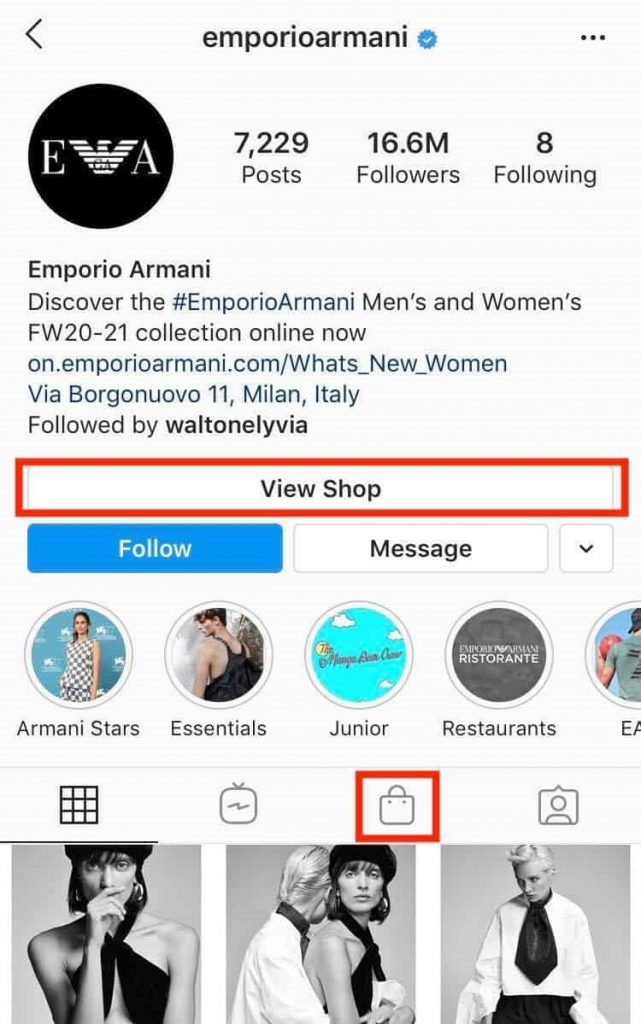
When we talk about the Instagram store/shop, we actually mean an account that activates the Instagram shopping feature and sells its products using the features provided by Instagram. When you enter such a page, you will see a big “View shop” icon, and if you touch it, you will enter the catalog section of that account and you can see the available products. Just a little below this big icon, in the posts bar, you will see a smaller icon in the shape of a handbag, and if you tap on it, you will enter the store of that account.
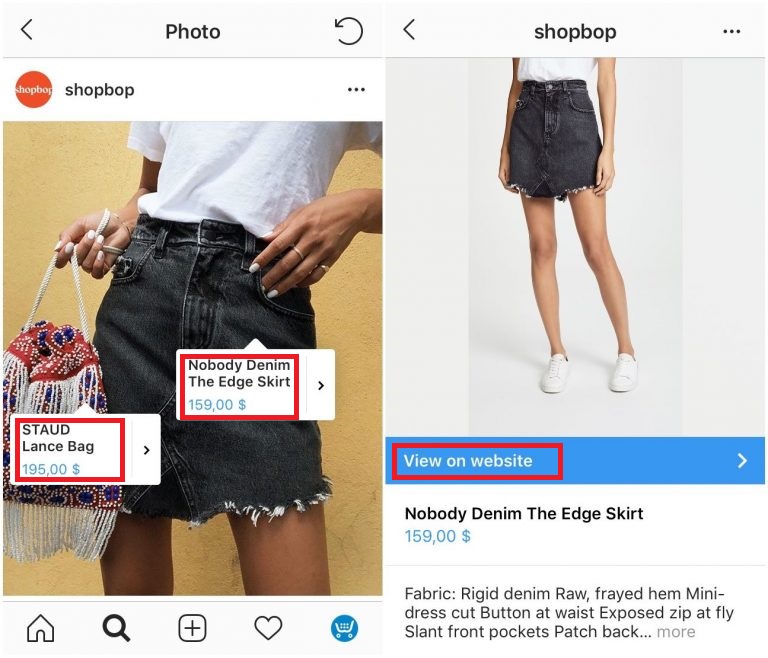
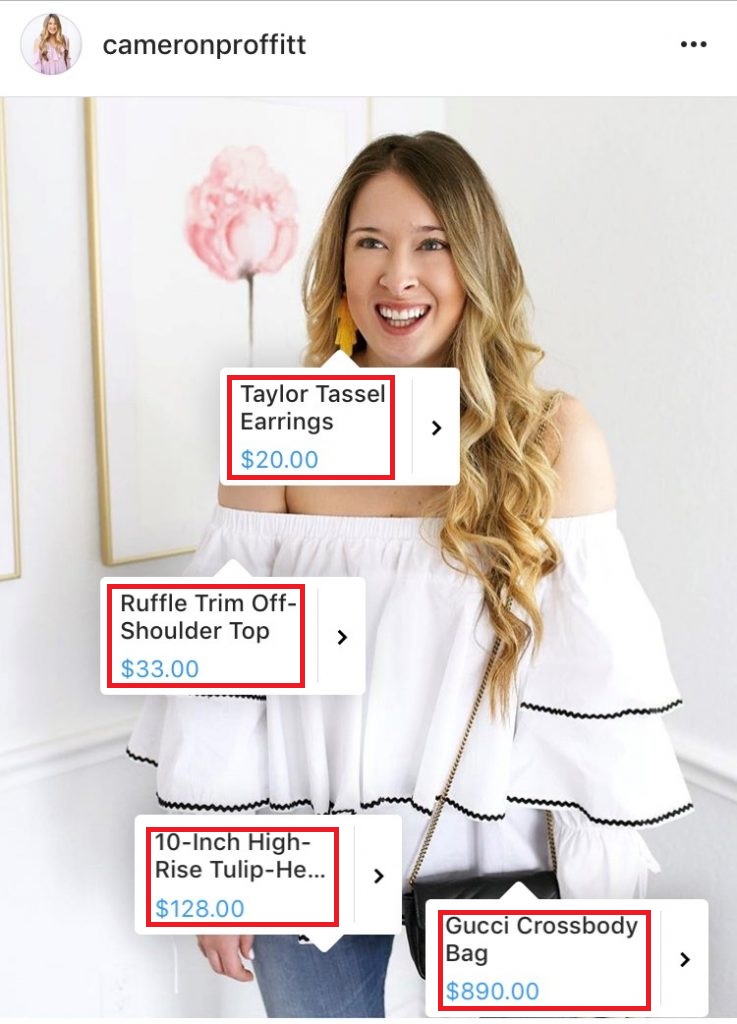
In addition to these two icons, another thing that shows that the shopping feature has been enabled for your account is the posts and stories that the page publishes. Posts made in such accounts have a special icon that distinguishes them from regular posts. Many people think that regular posts are no different from posts on the Instagram shop. But it is not like that at all. You may not feel the difference at first glance, but posts on these shopping pages are very different from regular posts. There is a bag icon in the corner of the posts that are posted on an Instagram shopping page, as shown in the image below.
If users click on such posts, they can see the specifications and price of that product, and if they like it, they can either buy it directly on Instagram, or be transferred to the brand’s website through the link in the post. and buy the desired product from the website.
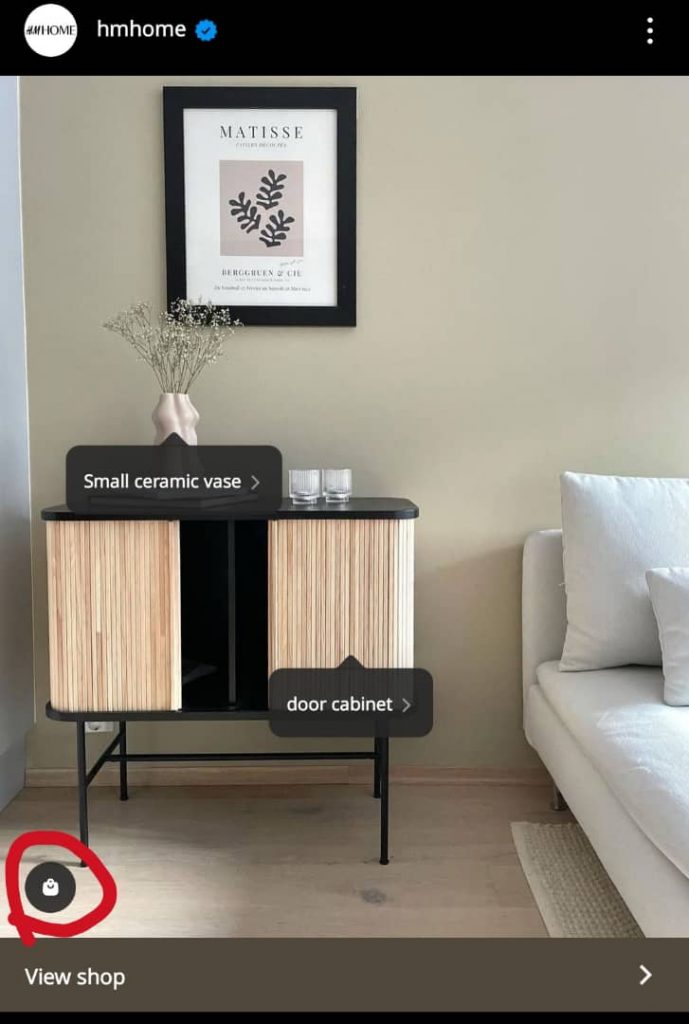
As we mentioned above, the pages that activate the shopping feature on Instagram can put their products in the story along with the purchase tag so that the audience can see the product in full, its specifications and price by touching the purchase tag.
Now that you are more or less familiar with the appearance of Instagram shops, it is better to learn its important terms so that you can activate this feature more easily.
What are the Terms used in the Instagram Shopping?
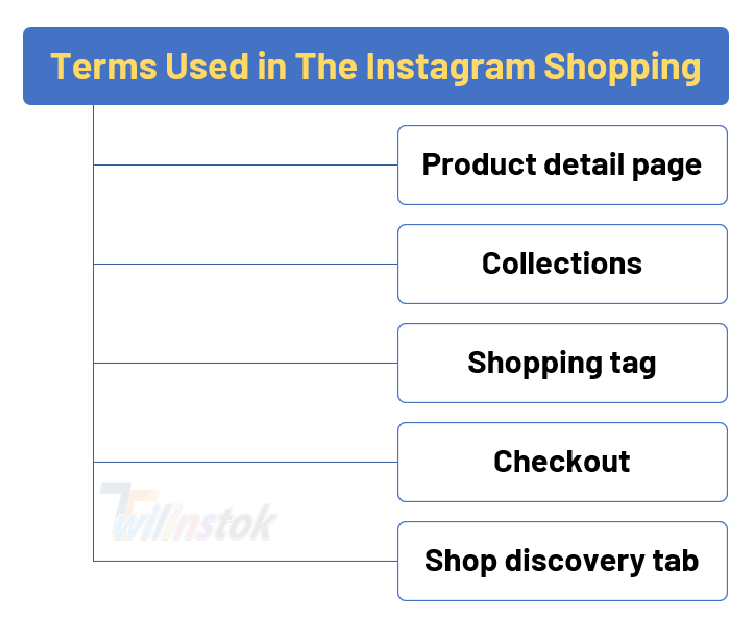
If you want to activate the features of the Instagram shopping and grow your business, you need to learn the terms that are related to it so that you don’t get confused. In the following, we explain some of these important terms very briefly, which are:
- Product detail page
- Collections
- Shopping tag
- Checkout
- Shop discovery tab
Now let’s examine the terms we mentioned above.
Product detail page
Product detail page, is where your audience can see all the information about the product they want. This information includes the photo of the product, its price, its properties and necessary explanations about it.
Collections
Collection includes products that are placed in a category due to common properties and are shown to the audience as a group in the catalogs. For example, spring collection, autumn collection, end of season auction etc.
Shopping tag
Shopping tag can be used for advertising. The shopping tag allows the store owner to tag the products in the store’s catalog in their posts and stories. As a result, the audience can click on these tags and see the product specifications and price in full.
Checkout
Checkout, which means buying a product on Instagram, can only be used in a limited number of countries in the world. In countries where the possibility of buying directly from Instagram is active, customers buy their products without leaving the Instagram application.
Shop discovery tab
One of the attractive features that make Instagram shops look a lot like real world stores is the Shop discovery tab. This term stands for store view page and it allows users to visit stores that they have not followed. This feature evokes the feeling as if the audience is walking in a mall and watching the products behind windows of different stores.
Now that you are familiar with the terms of Instagram stores, it is time to teach you how to activate this feature on Instagram.
How to Set Up an Instagram Shop? [Step-by-step Tutorial]
Before we teach you how to activate the Instagram store feature, it is better to determine whether we have the terms and conditions that Instagram has considered for this feature or not. The conditions and policies of Instagram to activate this feature for users are as follows:
1- Use the latest version of Instagram. If your Instagram app is old, be sure to update it through Google Play Store or App Store.
2- Have an account on Facebook. If you do not have an account on Facebook, create an account very quickly.
3- Have a business account on Instagram. If your account is personal, don’t worry at all; Because converting a personal account to a business account is like very easy and we will teach you how to do it.
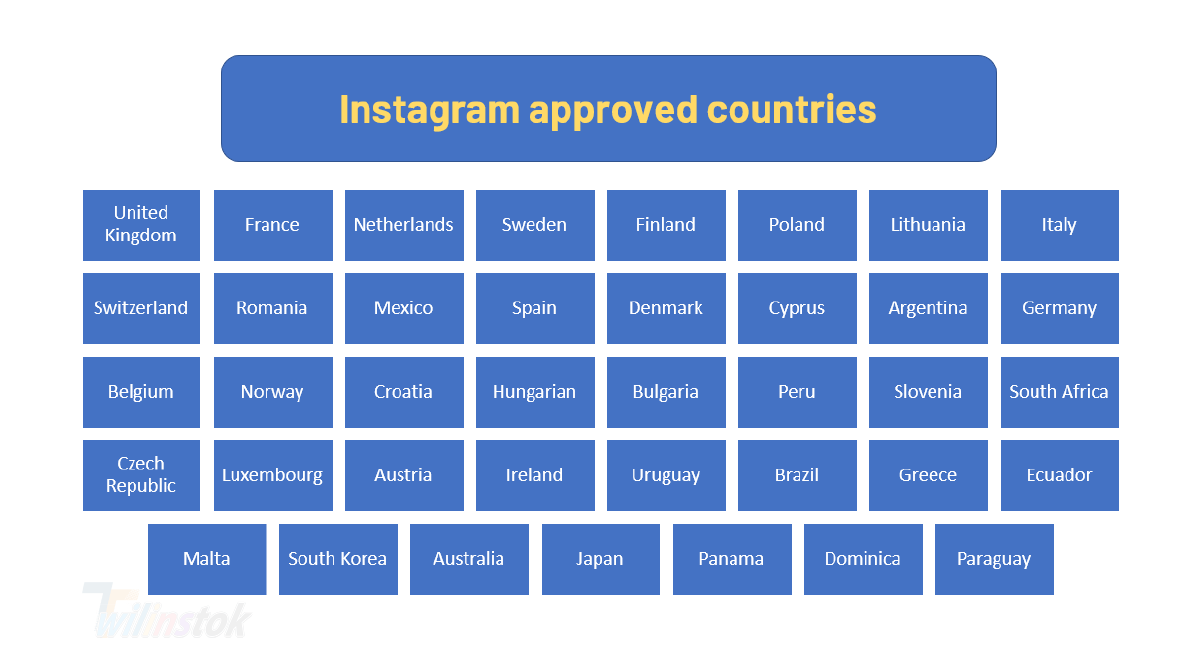
4- To activate the Instagram shopping feature, you need to live in a region where this feature is available. The list of countries that have access to this feature of Instagram is as shown in the below image.
5- The products you are going to sell must be physical, not services. For example, you can sell clothes and cosmetics.
6- The products that you are going to put in the Instagram shop must comply with the rules of Instagram. This means that you cannot sell illegal goods such as weapons, drugs, etc.
7- If you want to activate the Instagram shopping feature, you need to link to a website to introduce and sell your products.
8- If you meet all the above conditions, you can request Instagram to enable the Instagram shopping feature for you. In the following, we will try to guide you step by step to do this.
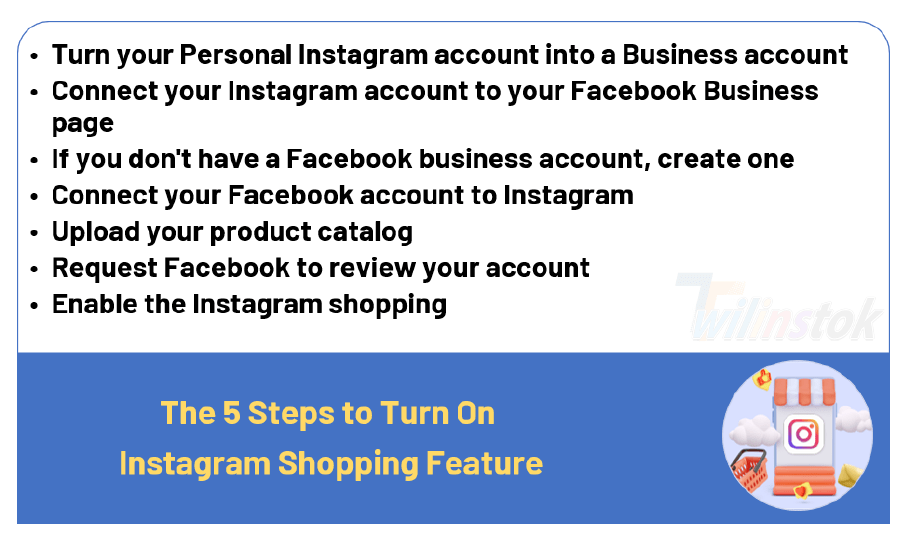
The 5 Steps to Turn On Instagram Shopping feature are:
- Turn your Personal Instagram account into a Business account
- Connect your Instagram account to your Facebook Business page
- If you don’t have a Facebook business account, create one
- Connect your Facebook account to Instagram
- Upload your product catalog
- Request Facebook to review your account
- Enable the Instagram shopping
1st Step: Turn your Personal Instagram account into a Business account
In order to activate the Instagram shopping feature, you must have a business account on Instagram. If you don’t have an Instagram account at all, you need to create an account first. But, if you already have an account, you just need to convert it to a business account to be able to use the features that the Instagram store provides. But how to convert a regular Instagram account into a business account? It’s very simple.
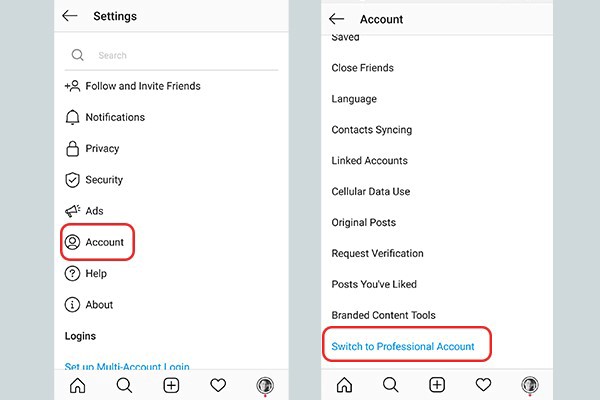
After making sure you are using the latest version of Instagram, log in to your page and go to settings. Then a list will come up in which you have to select the account option from among the available options. After selecting the account option, you will enter a new page where you must select the Switch to professional account option. You can do these simple steps according to the picture below.
After you have done all the above steps correctly, Instagram will ask you to specify your business type as shown below.
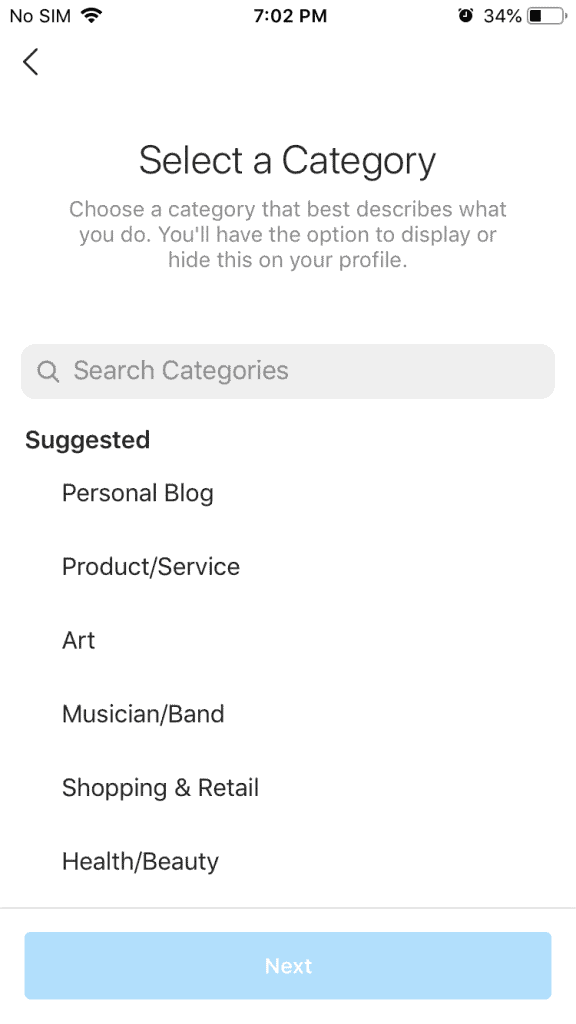
After choosing your desired category, Instagram will ask you if you want your business information to be shown on your bio page or not. If you want information about your business to be displayed in the bio, enable the Display Category Label option. Otherwise, ignore this section and touch Done or Next at the bottom of the screen.
After you select Done or Next, if your page is personal, you will receive a message from Instagram telling you that you must make your account public in order to commercialize your account. If your page is not public, you cannot make your account business; As a result, you must specify the Instagram store. So, select the Ok option to make your page public.
After selecting the ok option, Instagram will show you two options to choose one of them.
Business option: This option is for business owners, those who have a brand, those who want to start an Instagram store and sell their products.
Creator option: This option is for those who want to become bloggers or influencers on Instagram and create content.
After selecting the Business option, as shown in the picture above, click Next to convert your account into a business account. Now that we are done here, let’s move on to the next step.
2nd Step: Connect your Instagram account to your Facebook Business page
After you convert your Instagram account to a business account, you need to connect the Instagram business account to the Facebook business page. For this, you need to have a business account on Facebook, because if you do not have a business account on Facebook, it is not possible to activate the shopping feature on Instagram.
To connect the Instagram business account to the Facebook business page, you must link these two accounts together. But how? It is not difficult at all. According to the image below, you enter the setting section of your account and there you select the Account option and then the linked account option. A new page will open for you to choose from among the available Facebook items. After you select Facebook, a window will open where you need to touch the connect option to connect your Instagram business account to your Facebook business account.
3rd Step: If you don’t have a Facebook Business account, Create one
But, you may not have a Facebook business account at all. What is the solution then? No need to worry at all. We will teach you how to create a business account on Facebook.
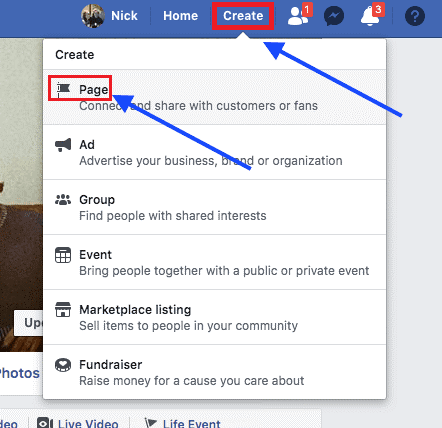
Step 1: Register on Facebook and select the create option and then the page option on the top bar of the page as shown in the image below.
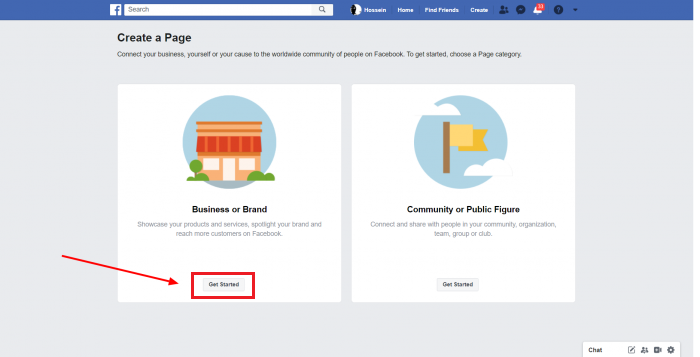
Step 2: Here you have to click on the section named “Business and brand” to open a new page.
Step 3: A new page will open for you where you have to enter certain information. As you can see in the image below, this information includes your brand name and type of business. In fact, Instagram wants to know what you are going to sell.
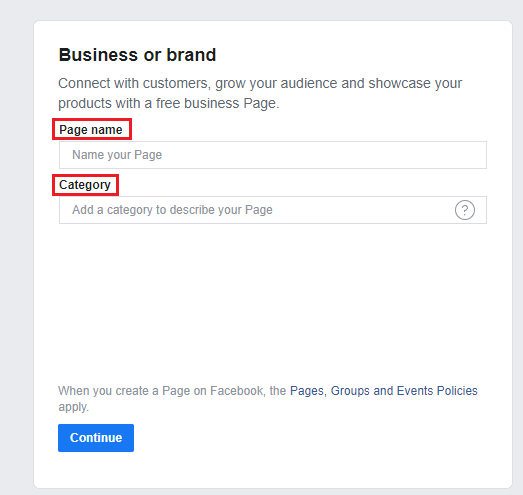
There’s a catch here, and that’s that only brands can access the shop feature on Instagram that sells physical products. Such as clothes, cosmetics, decorative items, etc. As a result, it is necessary to choose something that is physical when filling the box related to a category.
As you can see in the photo above, on this page you will see two boxes. One of them is name and the other is category. Name is the brand name and category is the type of your business. For example, you can select a boutique store in the category section, which means clothing store.
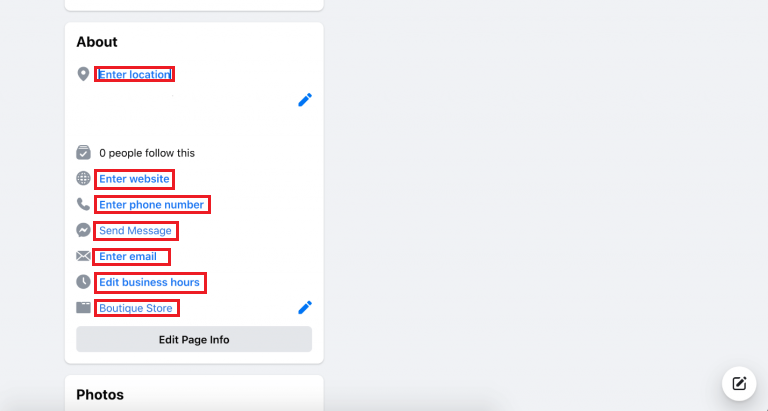
Step 4: In this step, you need to complete your information. As you can see in the photo below, you must fill in the fields related to Location, Zip code and Address carefully because the smallest mistake will make you lose your chance to create an Instagram shop.
Step 5: After you have completed your information carefully, you should go to the profile picture and username. It is better to choose a profile picture and username related to your business.
Now that you have created a business account on Facebook, you need to connect it to your Instagram business account. In the following, we will talk about the steps to do this.
4th Step: Connect your Facebook account to Instagram
Before you can connect Facebook to Instagram, there are a few things you need to complete. To enter the final information and connect your Facebook page to your Instagram account, you must follow the steps below.
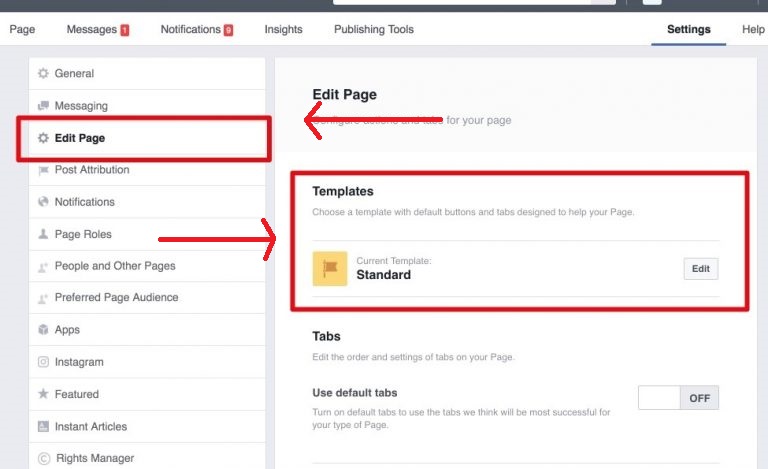
Step 1: In your Facebook account, enter the settings section and select the Templates and tabs option.
Step 2: Go to the setting again and click on the Edit page option. A new page will open for you where you have to enter and complete the information very accurately so that the Instagram shopping feature can be activated without any problems.
As you can see in the photo below, your page template is in the standard mode. You should not forget that all parts of your page should represent a physical store. As a result, click on the Edit option to set your page template.
Step 3: Since all parts of your account must be business, it is better to select the Business template option and then touch the Apply template option. Then enter the tabs section as shown below. As you can see, there are about 10 tabs by default that you can choose from.

But if you want to add a new Tab and activate it, you should go to the bottom of the page and select the Add a tab option. For example, you can add a shopping tab and then move it to the top of the page.
Now it’s time to connect your Facebook account to your Instagram account. This is very simple and can be done easily. Just go to the settings section on Facebook and choose Instagram from the available options. A page will open where you have to click on the connect account option and, after entering the information, allow Facebook to access Instagram. Of course, make sure you see your profile picture; Otherwise, Facebook and Instagram accounts are probably not connected to each other.
5th Step: Upload your Product Catalog
Now that we’ve done all the above steps, it’s time to set up our storefront. What we do in this step is to create and upload our product catalog to Facebook. In order to be able to put our products on the Instagram store later, we need to manually upload them to Facebook first. This can be done in the following way:
Upload your product catalog with the help of Facebook business catalog manager
Log in to your Facebook account and select commerce manager. Then, click on get started and select create catalog.
Now, you have to select the ecommerce (products) option and click on next. Then, select the Upload product info option to upload your products to the catalog. Finally, you just have to choose a name for your catalog and write it in the name box. Then, touch the Create option.
Now you need to go to the Commerce catalog again and select the catalog you created. Then select the Add items option followed by the Add manually option and tap next.
Here you can upload photos of your products. Note that the photos you upload must be at least 500 x 500 pixels. In addition to the product photo, you can enter all the information you want. For example, write the name of the product, its properties and its details in this section.
In the item category section, select the category you want and then click on the Finish option. To add other products, you must select the add another item option and do all these steps again from the beginning.
Now that you have created your catalog, we need to move on to the next step.
6th Step: Request Facebook to review your Account
Well, now that you’ve almost done everything and are near the end of the road, it’s time for Facebook to review and approve your request. Of course, keep in mind that it may take a few days to get approval, and in the meantime, there’s nothing you can do but wait.
To do this, go to the settings section of your Instagram profile, select the Sign up for Instagram shopping option, and do all the steps that are asked of you one by one. Finally, select the submit option to confirm your account for review.
7th Step: Enable the Instagram Shopping
After your catalog has been approved by Instagram, you will receive an email from Instagram indicating that your request to use the Instagram shopping feature has been approved. Now you have to bring the shop that you have set up on Facebook to Instagram so that your audience can see them. To do this, do the following steps:
Step 1: Go to Instagram settings and select Business and then Shopping. Finally, click Done to upload all the information you uploaded to your Facebook catalog to your Instagram store. Congratulations. You are done and now you own an Instagram store.
Now that you have enabled the ability to use the store, do you know how you should use the features you have in your stories and posts?
How to use the New Shopping Feature in Instagram posts and stories?
Making posts and stories in the Instagram store is not much different from normal posts and stories. However, we will explain them very briefly and usefully so that you don’t get into trouble in your work.
How do I post items to Sell on an Instagram Shop?
Repeat the same steps as for regular posts. Choose the photo you want, if you want you can put a filter on the photo, write a caption under the photo and add a location if you wish. The only difference between shop posts and regular posts is related to the product tag section.
Click on the product tag, then select any part of the photo you want and tag the product name. Make sure that the name of the product you tag in the photo matches the name of that product in the catalog and is the same so that Instagram can find it in your catalog.
In addition, if you are wondering about the question that how many products can someone tag on Instagram? you need to know that you can tag a maximum of 5 products in your posts. Finally, select Done and then Share to publish your post.
How do I Tag a product to Sell on Instagram story?
Posting a story in the Instagram shop is not much different from posting a normal story. But in the story section of Instagram stores, it is an active feature that does not exist in normal accounts. This feature is the sticker tag of the product that you can see in the image below.
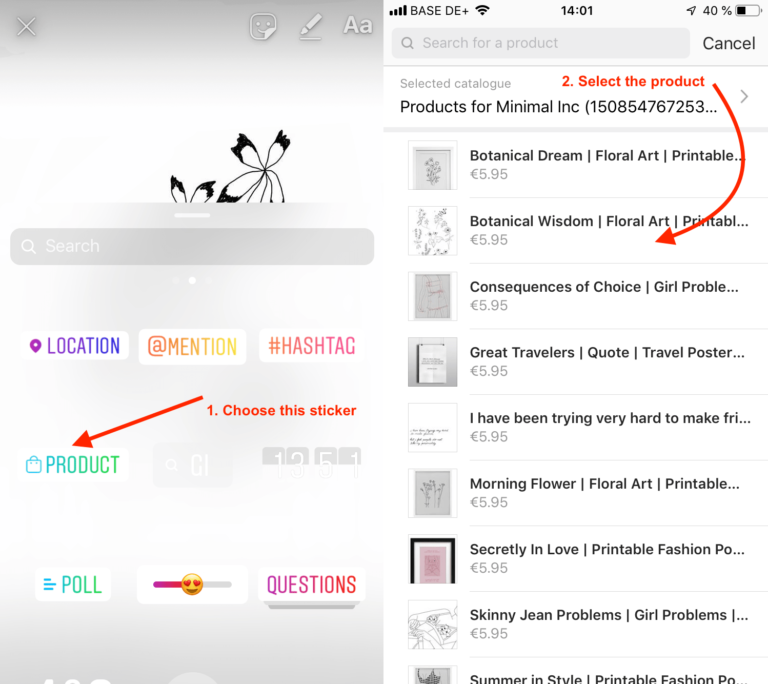
To post a story in an account that has enabled its Instagram shopping feature, you must first select the photo or video you want. Then you touch the sticker icon at the top of the screen and select the product tag sticker in the list that appears. In the next step, you have to choose the product you want from the catalog you see and share your story.
Suggested articles to read more
- Instagram Tips For Beginners – Tips On How To Use Instagram! [+]
- Mention Limit On Instagram [+]
- Instagram Follow Limits Per Hour & Day [+]
- How To Make A Great & Successful Instagram Page? [+]
- How To Get More Comments On Instagram, Fast & Free? [+]
- CSRF token missing or incorrect in Instagram account [+]
- How to make money on Instagram Reels in US? [+]
Conclusion
If you own a business on Instagram, don’t overlook the impact of the Instagram shopping feature. It is true that creating an Instagram store seems a bit complicated and has its own problems, but by reading this article, it will be easy for you to own an Instagram shop.
The advantages of using an Instagram store to sell your products are so many that it outweighs the difficulties of the road. So, don’t ignore this work and start working as soon as possible. With the help of this article, where we have explained everything about How to Create an Instagram Shop, you can create an Instagram shop without the slightest problem and become more successful in your business.
For more information about Instagram and the features of this social network, we suggest that you click on Free Instagram Tutorial [+]. Also, if you have any questions about Instagram, you can ask them in our Instagram support center [+] in the form of a topic and wait for the answer of our experts.
Plus, If you are satisfied with our article, we will be more than happy if you rate this article by giving it 5 stars.
Feel free to ask any question you have in mind the in the comments section below.